Wednesday, September 28, 2011

Prayers for Rick Gray


Rick Gray, one of the premier RV pilots and builders in the country, is in the hospital in fair condition, following the crash of an RV-10 he was test piloting last night.

According to the Marietta Times:
The plane caught fire during the crash and both men received serious burns. They were transported to Marietta Memorial Hospital and later flown by Life Flight to the Ohio State University Medical Center in Columbus.

A spokesperson at The Ohio State University Hospital in Columbus said Wednesday afternoon that Austin was listed in fair condition. Information about Gray was unavailable.

Back in 2009, I did an interview with Rick for an issue of the RV Builder's Hotline. You can find it here.

Saturday, September 24, 2011

Clear!

You never really know for sure when you're tackling the process of installing the engine whether you're doing it right or whether it's going to work until you try to start it.

The engine is the only part of the RV-7A project that I couldn't pay for as I went along, so the idea of maybe ruining it while starting it for the first time is always in the back of your mind -- in my case -- for the three years I've been working on it.

The closer I've gotten to the first flight of N614EF, the slower I've gone. The big noisy thing in the front simply isn't the area I want to zip along on.

Today, however, was the day to see whether I knew what I was doing. It turns out, I did, I just didn't know it.


Famed RV builder and pilot Pete Howell was kind enough to drive over from the other side of the cities (the ceiling was too low for him to fly over) to handle the photography duties.


It took awhile to get the oil pressure up. I cranked it for a good long time while keeping an eye on the Grand Rapids Technologies EIS 4000 engine monitor. The spark plugs, of course, were not installed for this process. I never did get a reading, so I took the oil line off where it attaches to the manifold transducer for the oil pressure sensor, cranked the prop a few times until it burped oil and reattached.

Once the engine was eventually started, the oil pressure indication on the engine monitor came up just fine.

There were no leaks -- RV pal Brad Benson was in charge of finding them. My son Patrick did the video work (there are two cameras above) and stood by for any injuries (he's a paramedic). Adam, whose last name I've never learned but who stops by every weekend to help, provided critical guidance on getting the electronic ignition squared away, Vince Bastiani was on the radio with me as I barked readings, Pete took the pictures, and Ami the hangarlord was Ami.

I didn't run it past 1200 RPM and I didn't remember to check to be sure that BOTH the electronic ignition AND the the mag RPM readings were similar; there'll be time to do that before first flight. And my attempt to videotape from the inside of the cabin didn't work out because I forgot to put the start button. I prefer to think my focus was on "flying the airplane."


The next steps are finishing the firewall (I'm adding a GPS antenna platform under the cowl, finishing the cowling (sanding and then priming), adding a little more baffling and sealing the baffling with RTV, gear leg fairings, intersection fairing, empennage fairing (mostly done), and adding the interior. I have a new wet compass to install in the panel, I want to add a power adapter and a traffic monitoring system and that should be all I need.

I've planned all of the winter for this work and maybe sometime in the spring, we'll take N614EF for a ride.

Find Pete Howell's album of his fine photographs of the event here.

Tuesday, September 20, 2011

Flying tight patterns

I guess this video has been out for awhile, but it's the first time I've seen it. It's fabulous!


I usually observe the 45 degree entry to the base leg, but it feels to me as if I'm often still dragging the Warrior II in (is there any other way to fly the Warrior?).

Then I watch pilots at the airshows and notice they seem to make their base turn just a few feet from the end of the runway and seem to just pivot the plane around a point at somehow lose a lot of altitude in a hurry.

The key, I guess, is to be able to do that and still provide a stabilized approach that gives an average pilot the opportunity to evaluate the approach and the coming (hopefully) landing.

Jason Schappert, who does a nice job providing weekly flying tips via video, this week has a great video on the power-off 180 and how to practice it.

Monday, September 5, 2011

I'm standing between you and the terrorists

You knew, didn't you, that the Department of Homeland Security's breathless warning of small planes and terrorism would spawn at least one local TV story about the evils that lurk behind a fixed-pitchprop.

I got in this one.

Monday, August 29, 2011

USA Today on experimentals

There'll probably be the usual amount of anti-media braying about the media treatment of experimental aircraft following the weekend USA Today story (from the Detroit Free Press) about the NTSB probe into why experimentals are crashing at a greater rate than certified airplanes.

But did you notice how Detroit Free Press treated the story? They started it with the perspective of a homebuilder. A real, honest-to-goodness builder of airplanes! Someone somewhere was smart enough to develop a relationship with a reporter so that when a story came along, the perspective of the builder dominated it. (We know it wasn't you, AOPA!)

The hand-built biplane pilot Bob Richards brought to an air show in a neighboring county Sunday is the type of aircraft that has come under scrutiny by federal safety officials studying the accident rate among amateur-built planes.

Tom Vukonich of Metamora, Mich., tries to determine the best way to install a rod into the fuselage of the biplane that he's building.

Richards, 41, of Joliet, Ill., once glided another hand-built plane down after the engine quit because the person who built it wired the battery wrong.

Yet he doesn't worry about his safety in a hand-built plane. "There are a lot of accidents that don't have anything to do with how it was built," said Richards, noting pilot error, weather and the difficulty of flying high-performance planes.

I presume some people will kvetch that the paper did the story at all. But the truth is that the NTSB is looking into it, and homebuilts are going down at a fairly high rate.

We could save a lot of kvetching if we simply fly better and smarter because, it's true, they don't usually crash for structural reasons.

Thursday, August 11, 2011

Finishing the RV cowling

I'm kind of a neat freak and I don't care much for dust, so it's rather odd that I once considered building a GlaStar, a plane that is all composite with metal wings. It would have required lots of chemicals and lots of sanding. And lots of dust.

After I sent my deposit in on a GlaStar kit, the company went belly up, so I bought an RV airplane kit instead.

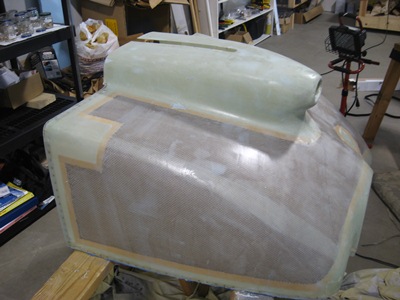
But there's plenty of fiberglass work on these things, too. I'm knee deep in it. I still have plenty of fairings to construct, but first I need to finish the cowling, which I actually started almost two years ago.

All the fitting is done now, of course, and the cowling is being prepped for an eventual paint job. With fiberglass, there are thousands of pinholes which will show up as soon as you finish that $5,000 job. You have to get rid of them first.

My technique worked well on the top cowling, so there's no reason to change the bottom cowling portion. The first step was to thin some epoxy with acetone and brush it on, after a good sanding with #80 grit sandpaper.


Sure, it looks all shiny and stuff, but don't let it fool you; it's full of pinholes. Some of them, hopefully, will be partially filled.

The next day -- yesterday, actually -- I sanded it all off with more #80 grit. Then I mixed up the two-part SuperFil, spread it on and squeegeed it off, except for the small part that filled in the pinholes.


Then this evening, I sanded that all off -- yep, #80 grit -- and opened up an almost-empty can of Super Prime, which is a VERY weighted primer filler that you roll on. It'll fill in, hopefully, most of the pinholes that are left.


I'll sand this all off, too, and then add three more coats and sand it with #180 grit and it should be ready, then, for a nice epoxy primer. Unfortunately, I probably don't have enough left, and it's $60 a quart. I got in the wrong business.

None of this will be done until September, apparently. We're heading out on a vacation back to New England.

Oh, I also installed the fuel overflow tube today. That should be the last item to be installed on the engine. We're ready to go through the process of starting the engine for the first time.

Sunday, August 7, 2011

The Oshkosh video everyone waits for

Oshkosh doesn't end until the guy who annually produces the finest video about it says it's over.

It's over.

Friday, August 5, 2011

Everything but a homebuilt

I didn't get to Oshkosh this year and, frankly, I didn't hear a great deal of excitement about Oshkosh this year. In the weeks after AirVenture, you usually get a lot of complaints that the EAA isn't about homebuilders, anymore. This year is no exception. You can set your watch by the outbreak.

Personally, I don't much care. Oshkosh is big enough to find whatever interests you -- homebuilts included -- and what we're really talking about here is validation from the organization, an indication that homebuilders matter.

Here's a quarter. Call your therapist.


By the way, Slick Hutto, who produces the definitive Oshkosh video each year, says this year's version is only a few days away.

Thursday, August 4, 2011

Safety wiring for dummies

I posted this picture on Facebook the other day. It's the safety wiring of the bolts that hold the filtered air box top plate to the fuel servo. Pretty, eh?


When I was doing this, I was referring to AC 43.13, the so-called "bible" of building and maintaining an airplane (order yours today!), specifically this page.


In fact, I was holding the page up to the plate as I figured out how to properly secure it. Compare:


The problem is: I'm not seeing much of a difference there.

I mention this because one of my RV-building buds sent me a note on Facebook.

Take a look at http://scootermcrad.blogspot.com/2011/04/how-to-safety-wire.html for some great examples of what it should look like.

It is definitely an art to figure out how to safety stuff properly. It shouldn't take you very long to redo those 4 bolts since they are extremely accessible. I learned from a local builder showing me the tricks to safetying. It sure was a lot easier to get some tips and tricks from him rather than my method of trial and mostly error!

I know he's probably right because he's highly regarded as a good builder, but I'm not seeing what it is that's different in the photos above and I presume he hasn't been on Facebook lately to see my return query.

So I am missing something really important here. But what is it?

Update 8/10/11 It should've looked like this. Many thanks for all of the advice.


Monday, August 1, 2011

The Cowling Chronicles - Episode 4

It's been quite awhile since I last produced a Cowling Chronicle, detailing the very long process of the fiberglass portion of firewall forward. In this latest episode, I tackle the final part of installing the filtered air box, the "tunnel" to create a smooth flow of air from the "snout" in the chronicle to the air box which filters the air into the fuel servo.

Once this process is done, and with a little wiring to be completed, I'm pretty close to firing up the engine for the first time.

In the meantime, I'm working on the cosmetic part of the top cowling, which is filling pinholes and sanding primer.

Many thanks to the people on Van's Air Force for helping getting me started on this particular aspect of the project. The directions are such that they make perfect sense once you do the project and go back and look them, but they're pretty to visualize when you're trying to get started. So I hope this helps builders who find themselves in this position.

Wednesday, July 27, 2011

The elephant man


There was a time in airplane homebuilding when the finished product had its share of warts and flaws that stood out like a sore thumb. The goal was the challenge of building an airplane that flew. I wish I'd built an airplane in those days because I'm not sure this one fits me. As N614EF nears completion, I'm embarrassed for other builders to see it.

This era is about building flawless airplanes worthy of Oshkosh; functionality is important, but the lovely finished product is a statement about the builder. Sure, there are dings here and there, but nothing serious and certainly nothing embarrassing.

N614EF's nickname is Auntie Marge, named after a wonderful relative of my wife's who was all about enjoying life. After this evening, I'm thinking of changing it to Elephant Man.

Years ago, when I was originally fitting the frame upon which the canopy would sit, I misdrilled a hole -- one stinking hole -- that allows one side of the canopy to sit slightly higher than the other.

Note, for example, the spot at which the canopy meets the front skin. The skin is sticking up about 1/4" and will, no doubt, act like an air scoop (click any of these pictures for the full monty).


Which creates this gap you can throw a cat through on the side...


Oh, it gets worse. This is a tip-up canopy and when it lifts up, the skin at the base of the canopy moves slightly forward and if a shim isn't put under the canopy frame to raise the skin slightly, it catches on the the skin in front of the canopy. Guess who forgot to put the shim in when riveting the canopy skin to the canopy frame?

So when the canopy lifted up, it caught on the front skin and cracked the fiberglass fairing. The only way to solve the problem is to file away the skin so that it doesn't catch. Doing that creates one heck of a gap. Keep in mind the company says the gap should be 3/32" inch here. This is about a half inch. Functional? Sure. Embarrassing? Yeah.


Normally, it should look something like this:


Another RV builder stopped by the hangar tonight. "I'd redo it," he said.

Allow me to translate that from the polite Midwestern lingo. "You suck at this."

Which, of course, I already knew, but it made clear that for as long as I hang around other people who build airplanes, I'll be apologizing for this one.

And, by the way, starting over would require a $1,200 canopy, and a few hundred dollars for a new canopy frame. I can't do it; I work for a living.

"Are you still thinking of selling this?" he said.

I am, but his message was clear; nobody will pay much to buy it.

All of this, of course, is -- in the lingo of Van's Aircraft, "gumption robbing."

Those thoughts I've had this week about flying N614EF to Oshkosh next year? Yeah, let's stop those.

Perhaps I should have built a time machine.

Greg Poe

Airshow performer Greg Poe died this week of a heart attack in Idaho. He used aviation to spread a motivational message to kids.

Friday, July 22, 2011

Feel-good aerobatics

I've never had a desire to do aerobatics when -- or if -- the RV-7A is finished. I wouldn't know how to do an aileron roll even if I had. SlickHutto on YouTube is the guy who makes those fabulous post-Oshkosh videos each year and he can make any activity look inviting.

Here's his latest video, the soundtrack of which uses my favorite song from one of my favorite -- and long dead -- TV series: Eli Stone. The guy just knows how to make everything perfect in his videos.

Monday, July 11, 2011

Magneto mysteries

I'm completely flummoxed by the wiring of the one magneto in my RV-7A and maybe you can offer some advice.

I have one Lightspeed electronic ignition in the RV, and one magneto. I'm not using the fancy and pricey rotary switch that is so common on airplanes; I'm using a simple toggle switch to activate the Lightspeed, and one to activate the magneto.

The Lightspeed wiring was pretty simple: run a wire to from the Lightspeed control box to a switch, wire through a pullable 5 amp circuit breaker to battery power.

The magneto is a little bit different. It doesn't use ship power, of course. It generates its own power and, thus, spark. Simple.

I've read Bob Nuckoll's discussion of the magneto; I'm not understanding its application.

Here's how I have it wired. Tell me where I went wrong. I made a so-called P-lead, which uses a single connector shielded cable. The conductor wire attaches to a post on the magneto. The shield is pigtailed to an 18g wire, which attaches to a ground stud. I used the construction practices as specified here, except that I soldered a wire to the shield, rather than crimp a connector onto the shield. I figured it would be more durable.


And so, here's how it looks on my magneto. You can click the image for a larger version:


My understanding is that when the magneto is grounded, it is, basically, off and when it is not grounded, it is on and capable of providing electrical power to the spark plugs.

I was under the impression that it is grounded when there is connectivity between the two posts/wires. The problem is from what I can tell there is always connectivity between the two posts and, subsequently, wires; at least there is when I measure it.

I ran this wire to a toggle switch on the instrument panel, figuring that providing connectivity between the two wires "grounds" the magneto, rendering it inoperative.

Here's the wires at the toggle switch:


So, under my theory, flipping the toggle switch upside down, the "down" position establishes a connection between the two wires which grounds the magneto, making it inoperative.

But because the two wires appear to be always with connectivity, because there's continuity between the two posts as I measure it, this would appear to make the switch itself irrelevant, which means I've done something wrong in my theory of how this works.

The problem is, of course, I don't know what it is.

Sunday, July 10, 2011

Paintjob of the year

We were out at KSGS (South St. Paul, Minn.) the other day when we stumbled across this beast.


Apparently, it's owned by the Kodiak company.
Share |